Back to blog
Research

Measuring Success: The Complete Guide to Evaluating Token Metrics AI Indices Performance
Explore how to evaluate Token Metrics AI Indices using key performance and risk metrics, with actionable insights to help you make informed, data-driven crypto investment decisions.
Token Metrics Team
11 min read
Want Smarter Crypto Picks—Free?
See unbiased Token Metrics Ratings for BTC, ETH, and top alts.
Thank you! Your submission has been received!
Oops! Something went wrong while submitting the form.
 No credit card | 1-click unsubscribe

Ask most cryptocurrency investors how their portfolio is performing, and they'll immediately cite a percentage return: "I'm up 50%" or "I'm down 30%." While simple returns matter, this single-dimensional view of performance obscures critical information about risk, consistency, and sustainability. Two portfolios with identical 50% returns might differ dramatically in risk profile—one achieving gains through steady appreciation, the other through wild volatility that could reverse suddenly.

Professional investors and institutional fund managers evaluate performance through multiple sophisticated metrics that reveal not just how much return was achieved, but how efficiently risk was managed, how consistently profits were generated, and how the strategy performed relative to relevant benchmarks. These metrics separate lucky speculation from skillful investing, and short-term anomalies from sustainable long-term strategies.

Token Metrics AI Indices are designed to deliver not just strong absolute returns, but superior risk-adjusted performance across multiple evaluation dimensions. Understanding these performance metrics empowers you to make informed decisions about index selection, allocation sizing, and strategy adjustments. This comprehensive guide reveals the key metrics that matter, how to interpret them correctly, and how to use data-driven evaluation to optimize your Token Metrics investment approach.

The Fundamental Performance Metrics

Absolute Returns: The Starting Point

Absolute return measures simple percentage gain or loss over a specific period. If you invest $10,000 and it grows to $15,000, your absolute return is 50%. This basic metric provides important information but tells an incomplete story.

When evaluating Token Metrics indices, examine absolute returns across multiple timeframes including month-to-date and quarter-to-date for recent performance, year-to-date capturing current year results, one-year, three-year, and five-year returns for medium-term perspective, and since-inception returns showing complete track record.

Different timeframes reveal different aspects of performance. Short-term returns show current momentum and responsiveness to market conditions. Long-term returns demonstrate consistency and compound effectiveness. Always evaluate multiple timeframes rather than fixating on any single period.

Annualized Returns: Comparing Across Timeframes

Annualized return converts returns of any length into equivalent annual percentage, enabling fair comparisons. A 100% return over two years annualizes to approximately 41% annually—useful for comparing against one-year returns of other investments.

Token Metrics reports annualized returns for all indices, facilitating comparisons across different indices with different inception dates and holding periods. When evaluating indices, prioritize annualized returns over cumulative returns for more meaningful comparisons.

Compound Annual Growth Rate (CAGR): The Smoothed View

CAGR shows the geometric mean annual return smoothing out volatility to reveal underlying growth trajectory. If a portfolio grows from $10,000 to $20,000 over three years, the CAGR is 26%, even if year-one returned 50%, year-two lost 10%, and year-three gained 40%.

CAGR proves particularly valuable for crypto investing given extreme year-to-year volatility. It reveals the "smoothed" growth rate you've achieved, providing perspective beyond dramatic individual periods.

Risk-Adjusted Performance: The Professional Standard

Why Risk-Adjusted Returns Matter More Than Absolute Returns

Achieving 100% returns sounds impressive, but if that required accepting 80% maximum drawdown risk, was it worth it? Another portfolio delivering 60% returns with only 20% maximum drawdown might actually be superior despite lower absolute returns.

Risk-adjusted metrics evaluate returns relative to risk taken. Professional investors prioritize risk-adjusted performance over absolute returns because higher risk-adjusted returns indicate skillful investing rather than lucky risk-taking. Two critical principles: more return for given risk is better, and less risk for given return is better.

Sharpe Ratio: The Gold Standard

The Sharpe Ratio, developed by Nobel laureate William Sharpe, measures risk-adjusted returns by dividing excess returns (returns above risk-free rate) by standard deviation (volatility). Higher Sharpe Ratios indicate better risk-adjusted performance.

Sharpe Ratio = (Portfolio Return - Risk-Free Rate) / Portfolio Standard Deviation

A Sharpe Ratio above 1.0 is considered good, above 2.0 is very good, and above 3.0 is exceptional. Traditional equity portfolios typically achieve Sharpe Ratios of 0.5-1.0. Token Metrics indices targeting 1.5+ Sharpe Ratios demonstrate superior risk-adjusted performance.

When comparing indices, prioritize higher Sharpe Ratios over higher absolute returns. An index with 40% returns and 1.8 Sharpe Ratio likely provides better risk-adjusted value than an index with 60% returns and 1.2 Sharpe Ratio.

Sortino Ratio: Focusing on Downside Risk

The Sortino Ratio improves on Sharpe Ratio by considering only downside volatility (negative returns) rather than total volatility. This distinction matters because upside volatility (large gains) isn't truly "risk"—investors welcome positive surprises.

Sortino Ratio = (Portfolio Return - Risk-Free Rate) / Downside Deviation

Higher Sortino Ratios indicate portfolios that deliver returns efficiently while minimizing painful drawdowns. Token Metrics' focus on downside protection through diversification and risk management typically produces strong Sortino Ratios.

Calmar Ratio: Return Per Unit of Maximum Drawdown

The Calmar Ratio divides annualized return by maximum drawdown, measuring how much return you earn per unit of worst-case loss.

Calmar Ratio = Annualized Return / Maximum Drawdown

If an index delivers 50% annualized returns with 25% maximum drawdown, its Calmar Ratio is 2.0. Higher ratios indicate more efficient return generation relative to worst-case scenarios. Token Metrics indices emphasizing drawdown management typically show strong Calmar Ratios.

Volatility Metrics: Understanding the Ride

Standard Deviation: Measuring Total Volatility

Standard deviation quantifies how much returns fluctuate around their average. Higher standard deviation means more volatility—both upside and downside.

Cryptocurrency exhibits extreme volatility. Bitcoin's annualized volatility often exceeds 60-80%, compared to 15-20% for stock markets. Token Metrics indices typically show lower volatility than Bitcoin through diversification, though still higher than traditional assets.

When evaluating indices, consider your volatility tolerance. If 50% annual volatility causes anxiety impairing sleep or decision-making, choose lower-volatility indices even if that sacrifices some return potential.

Beta: Relative Volatility to Benchmarks

Beta measures how much a portfolio moves relative to a benchmark (typically Bitcoin for crypto indices). Beta of 1.0 means the portfolio moves identically with the benchmark. Beta above 1.0 indicates amplified movements (higher volatility), while beta below 1.0 indicates dampened movements (lower volatility).

Token Metrics large-cap indices typically show betas near 0.8-1.0 relative to Bitcoin—moving somewhat similarly but with slightly reduced volatility through diversification. Growth indices might show betas of 1.2-1.5, amplifying Bitcoin's movements for enhanced return potential at higher risk.

Understanding beta helps set appropriate expectations. If Bitcoin returns 30% and your index has beta of 1.2, expect approximately 36% returns. If Bitcoin declines 20%, expect approximately 24% decline.

Maximum Drawdown: Worst-Case Scenario

Maximum drawdown measures the largest peak-to-trough decline during any period. If a portfolio grows from $10,000 to $20,000, then drops to $12,000, the maximum drawdown is 40% (from $20,000 peak to $12,000 trough).

Maximum drawdown reveals worst-case scenarios—critical information for risk management. Can you psychologically and financially tolerate a 50% maximum drawdown? If not, avoid strategies historically experiencing such declines.

Token Metrics indices show varying maximum drawdowns based on strategy. Conservative large-cap indices might experience 40-50% maximum drawdowns during severe bear markets, while aggressive growth indices might see 60-70% drawdowns. Understanding these historical ranges helps set realistic expectations.

Downside Capture and Upside Capture Ratios

Downside capture measures how much of benchmark's negative returns a portfolio captures. 80% downside capture means when the benchmark declines 10%, the portfolio declines 8%—better downside protection.

Upside capture measures participation in benchmark gains. 120% upside capture means when the benchmark rises 10%, the portfolio rises 12%—enhanced upside participation.

Ideal portfolios combine high upside capture with low downside capture. Token Metrics indices achieving 110% upside capture and 85% downside capture demonstrate skill in capturing gains while protecting during declines.

Get Started For Free

Benchmark Comparisons: Relative Performance

Choosing Appropriate Benchmarks

Performance must be evaluated relative to relevant benchmarks. For crypto indices, appropriate benchmarks include Bitcoin (the dominant cryptocurrency), Ethereum (leading smart contract platform), total crypto market cap indices, and equal-weighted crypto indices.

Token Metrics provides benchmark comparisons for all indices, typically against Bitcoin and total market indices. Evaluate whether indices outperform or underperform these benchmarks after adjusting for risk.

Alpha Generation: Beating the Benchmark

Alpha measures returns exceeding benchmark returns after adjusting for risk. Positive alpha indicates skillful investing beating passive benchmark holding. An index delivering 40% returns when Bitcoin returned 30%, with similar risk profiles, generates positive alpha.

Token Metrics' AI-driven approach aims to generate consistent positive alpha through superior token selection, optimal diversification, and systematic rebalancing. Historical alpha generation provides evidence of whether indices add value beyond passive Bitcoin holding.

Tracking Error: Consistency of Outperformance

Tracking error measures how consistently a portfolio's returns differ from benchmarks. Low tracking error means returns closely match benchmarks, while high tracking error indicates returns diverge significantly—either positively or negatively.

For active strategies like Token Metrics indices, some tracking error is expected and desirable—that's how alpha is generated. But excessive tracking error indicates unpredictable performance making planning difficult.

Time-Period Analysis: Understanding Performance Consistency

Rolling Returns: Capturing All Periods

Rolling returns analyze performance across all possible time periods rather than just fixed calendar periods. For example, examining all possible one-year periods in a five-year track record (starting every day) rather than just comparing 2020 vs. 2021 vs. 2022.

Rolling returns reveal consistency. An index showing positive rolling one-year returns 80% of the time demonstrates more consistency than one positive only 50% of the time, even with similar average returns.

Token Metrics reports rolling returns for various periods, helping evaluate consistency across market conditions. Prefer indices with strong rolling return performance over those with dramatic but inconsistent results.

Performance in Different Market Conditions

Evaluate how indices perform across different market regimes including bull markets (strong uptrends), bear markets (sustained declines), sideways markets (range-bound conditions), and high volatility vs. low volatility periods.

Indices performing well in all conditions demonstrate robustness. Those performing well only in specific conditions require tactical timing for success. Token Metrics' adaptive AI aims for "all-weather" performance, though some indices intentionally specialize in particular conditions (momentum indices excel in trends, for example).

Drawdown Recovery: Bouncing Back

Beyond maximum drawdown magnitude, examine recovery time—how long portfolios take recovering to previous peaks after drawdowns. Faster recovery indicates resilience.

If two indices both experience 50% maximum drawdowns, but one recovers in 6 months while the other takes 2 years, the first demonstrates superior resilience. Token Metrics' systematic rebalancing and diversification typically support faster drawdown recovery than concentrated portfolios.

Practical Application: Using Metrics to Make Better Decisions

Selecting Indices Based on Your Profile

Use performance metrics to match indices with your investment profile. Conservative investors prioritize lower maximum drawdown, higher Sharpe/Sortino ratios, lower standard deviation, and consistent rolling returns even with moderate absolute returns.

Aggressive investors accept higher maximum drawdown, might tolerate lower Sharpe ratios for higher absolute returns, embrace higher volatility, and can handle inconsistent periods if upside is substantial.

Review Token Metrics' index performance data with these priorities in mind, selecting indices aligning with your risk-return preferences.

Monitoring Performance Over Time

After investing, monitor performance quarterly using key metrics including absolute and risk-adjusted returns relative to benchmarks, maximum drawdown tracking whether risk parameters are respected, consistency metrics like rolling returns, and comparison against initial expectations.

If an index consistently underperforms benchmarks on risk-adjusted basis for 12+ months, consider switching to alternatives better meeting objectives. But avoid reactive switching based on short-term underperformance—all strategies experience periods of weakness.

Setting Realistic Expectations

Performance metrics help set realistic expectations. If historical maximum drawdowns reached 60%, expect similar or worse in the future. If annual returns averaged 40% with 30% standard deviation, don't expect consistent 40% returns every year—expect dramatic variation around that average.

Token Metrics provides comprehensive historical data supporting realistic expectation-setting. Use this data to mentally prepare for inevitable volatility and drawdowns, preventing emotional reactions when they occur.

Red Flags and Warning Signs

Certain performance patterns raise concerns including consistently increasing maximum drawdowns each cycle, declining Sharpe Ratios over time, persistent underperformance vs. benchmarks, increasing volatility without corresponding return increase, and inconsistent methodology or strategy drift.

Monitor for these red flags. While Token Metrics maintains rigorous quality standards, all strategies face challenges. Being attentive to warning signs enables proactive adjustments before problems become severe.

Advanced Metrics for Sophisticated Investors

Information Ratio: Consistency of Alpha

The Information Ratio measures how consistently a portfolio generates alpha relative to tracking error—essentially measuring manager skill.

Information Ratio = Alpha / Tracking Error

Higher Information Ratios indicate skillful, consistent outperformance rather than lucky or erratic results. Token Metrics targeting Information Ratios above 0.5 demonstrates systematic alpha generation.

Omega Ratio: Complete Risk-Return Profile

The Omega Ratio evaluates the entire distribution of returns, capturing all moments (mean, variance, skewness, kurtosis) rather than just first two moments like Sharpe Ratio.

Higher Omega Ratios indicate superior risk-return profiles capturing nuances missed by simpler metrics. While complex to calculate, Token Metrics provides Omega Ratios for indices, offering sophisticated performance evaluation.

Tail Risk Metrics: Extreme Event Analysis

Tail risk metrics evaluate performance during extreme market conditions including Value at Risk (VaR), Conditional Value at Risk (CVaR), and skewness/kurtosis.

These metrics reveal how indices perform during "black swan" events—rare but catastrophic market crashes. Token Metrics' diversification and risk management aim to reduce tail risk compared to concentrated crypto positions.

Creating Your Performance Dashboard

Essential Metrics to Track

Build a performance dashboard tracking key metrics for your Token Metrics holdings including monthly absolute and benchmark-relative returns, year-to-date and inception-to-date returns, Sharpe and Sortino Ratios, current drawdown from peak, maximum drawdown history, and rolling one-year returns.

Review this dashboard quarterly, taking notes on performance patterns, concerns, and successes. This systematic tracking prevents both complacency during good times and overreaction during difficult periods.

Using Token Metrics Platform Analytics

Token Metrics platform provides comprehensive performance analytics eliminating manual calculation needs. Familiarize yourself with available reports, charts, and comparison tools. Use these resources to monitor your holdings and evaluate alternative indices.

Set up automated performance reports if available, receiving regular updates without requiring active checking. This ensures you stay informed while avoiding obsessive daily monitoring that encourages emotional reactions.

Sharing Performance Discussions

Consider engaging with Token Metrics community forums or discussion groups sharing performance observations and questions. Other investors' perspectives provide valuable context and help identify whether your experience is typical or exceptional.

While past performance never guarantees future results, collective intelligence from many users evaluating indices from different perspectives enriches understanding and improves decision-making.

Token Metrics: Driving Data-Driven Index Evaluation

Token Metrics offers users institutional-grade analytics and a wealth of index performance data in one convenient platform. Whether you are reviewing absolute returns, risk-adjusted metrics, or comparing indices to top crypto benchmarks, Token Metrics provides easy-to-understand charts, rolling performance snapshots, and advanced tools for anyone seeking thorough, data-informed analysis. These resources empower crypto investors to track, compare, and refine their portfolios using transparent, actionable performance insights.

FAQ

What is the most important metric for evaluating a crypto index?

No single metric is most important—well-rounded evaluation considers absolute returns, risk-adjusted performance (like Sharpe and Sortino ratios), maximum drawdown, and consistency versus benchmarks.

How often should investors review index performance data?

Quarterly reviews using comprehensive dashboards (tracking returns, drawdowns, risk ratios, and benchmark comparisons) help investors set realistic expectations and guide data-driven adjustments.

Why is volatility especially relevant for crypto indices?

Cryptocurrency is known for high volatility, which can affect investor psychology. Understanding historical volatility helps investors select indices that match risk tolerance and minimize unexpected stress.

How do Sharpe and Sortino ratios differ?

Both measure risk-adjusted returns, but Sharpe considers total volatility while Sortino considers only downside risk. High Sortino ratios indicate efficient downside protection.

Why compare crypto indices to benchmarks?

Benchmarks like Bitcoin or total crypto market indices provide a reference point. Comparing performance reveals if an index adds value through alpha or if it simply follows wider market trends.

Disclaimer

This article is for informational and educational purposes only and does not constitute financial advice, investment recommendations, or an offer to buy or sell any security or asset. Performance metrics and statistics discussed reflect historical data and should not be interpreted as guarantees of future outcomes. Past performance is not indicative of future results. Investors should conduct their own research and consult with qualified professionals before making investment decisions.

Get Started For Free

Build Smarter Crypto Apps &
AI Agents in Minutes, Not Months
Real-time prices, trading signals, and on-chain insights all from one powerful API.
Grab a Free API Key
About Token Metrics
Token Metrics: AI-powered crypto research and ratings platform. We help investors make smarter decisions with unbiased Token Metrics Ratings, on-chain analytics, and editor-curated “Top 10” guides. Our platform distills thousands of data points into clear scores, trends, and alerts you can act on.
30 Employees
analysts, data scientists, and crypto engineers
Daily Briefings
concise market insights and “Top Picks”
Transparent & Compliant
Sponsored ≠ Ratings; research remains independent
Want Smarter Crypto Picks—Free?
See unbiased Token Metrics Ratings for BTC, ETH, and top alts.
Thank you! Your submission has been received!
Oops! Something went wrong while submitting the form.
 No credit card | 1-click unsubscribe
Token Metrics Team
Token Metrics Team

Recent Posts

Research

Best Cross-Chain Bridges for Crypto Traders (2025)

Token Metrics Team
20 min read

Who this guide is for: Traders, DeFi users, and multichain portfolio managers seeking secure, cost-effective ways to move assets across blockchains.

Top three picks:

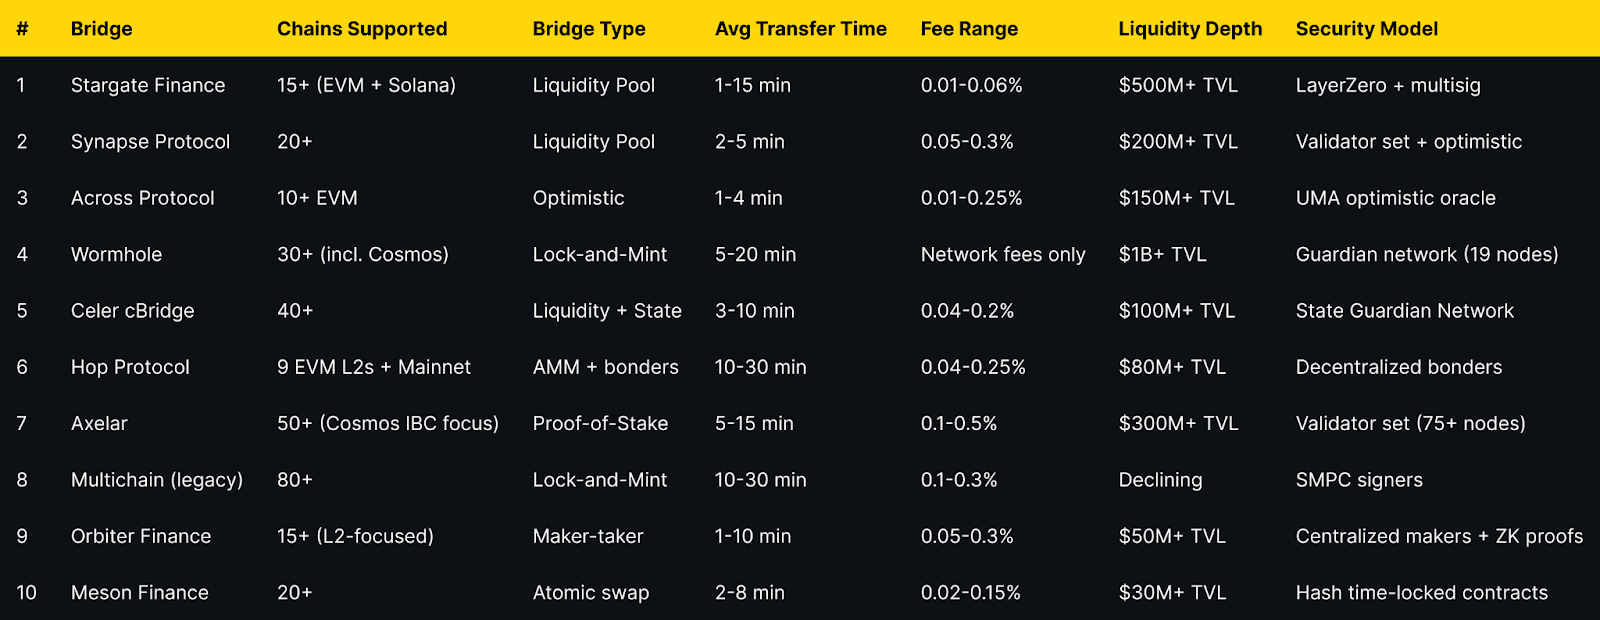
  • Stargate Finance — deepest liquidity for stablecoin transfers across major EVM chains and non-EVM networks.
  • Synapse Protocol — fastest routes for traders needing sub-5-minute settlements on 20+ chains.
  • Across Protocol — lowest slippage and optimistic bridging for arbitrageurs and high-frequency movers.

Key caveat: Bridge fees vary by route, liquidity depth, and network congestion; always compare quotes and verify destination addresses before confirming transfers.


Introduction: Why Cross-Chain Bridges Matter in 2025

Cross-chain bridges are infrastructure protocols that enable seamless asset transfers between blockchains, solving fragmented liquidity and allowing traders to access opportunities across ecosystems without holding native tokens on every chain. In 2025, with over 100 active Layer 1 and Layer 2 networks, best cross-chain bridges for traders deliver speed, security, and capital efficiency—critical for arbitrage, yield farming, and portfolio rebalancing. This guide evaluates the top 10 cross-chain bridges based on liquidity depth, security architecture, chain coverage, fee transparency, and user experience, helping you select the right solution for your trading strategy.


How We Picked (Methodology & Scoring)

We evaluated 20+ cross-chain bridges using six weighted criteria:

  • Liquidity & Volume (30%) — Daily transfer volume, pool depth, and slippage on major routes
  • Security Architecture (25%) — Validator model, audit history, exploit record, bug bounties
  • Chain Coverage (15%) — Number of supported networks (EVM, non-EVM, L2s)
  • Costs & Fees (15%) — Bridge fees, gas optimization, hidden slippage
  • User Experience (10%) — Interface clarity, transaction speed, wallet integrations
  • Support & Documentation (5%) — Docs quality, status pages, support channels

Data sources: Official protocol documentation, pricing pages, security audit repositories, and status dashboards. Third-party volume data from CoinGecko and DefiLlama used for cross-checks only.

Last updated: November 2025


Best Cross-Chain Bridges in 2025 (Comparison Table)

Top 10 Cross-Chain Bridges in 2025

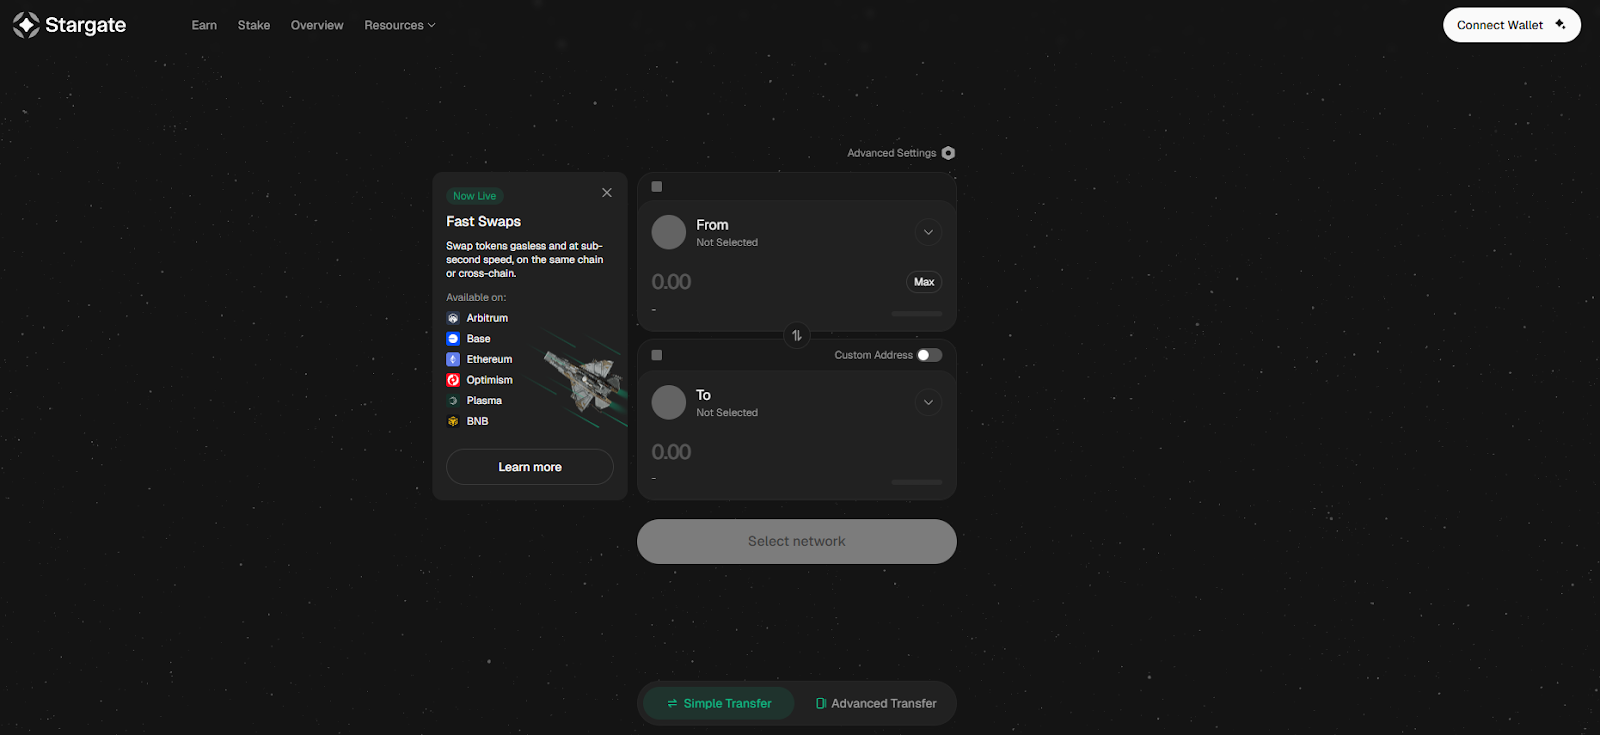
1. Stargate Finance — Best for Stablecoin Transfers

Why Use It: Stargate leverages LayerZero's messaging protocol to offer unified liquidity pools across 15+ chains, ensuring minimal slippage for USDC, USDT, and DAI transfers. Traders benefit from instant guaranteed finality and native asset transfers without wrapped tokens, making it ideal for large stablecoin movements between Ethereum, Arbitrum, Optimism, Polygon, BNB Chain, Avalanche, and Solana.

Best For: DeFi yield farmers, arbitrageurs moving stablecoins, traders rebalancing across chains, institutional desks.

Notable Features:

  • Unified liquidity pools eliminate fragmented routes
  • Delta algorithm prevents pool depletion and maintains balance
  • Native USDC/USDT support on major chains
  • Audited by Quantstamp and Zellic with $25M bug bounty

Consider If: You need to bridge non-stablecoin assets frequently (limited ERC-20 coverage) or require sub-1-minute finality (average 1-15 min).

Alternatives: Synapse Protocol, Across Protocol


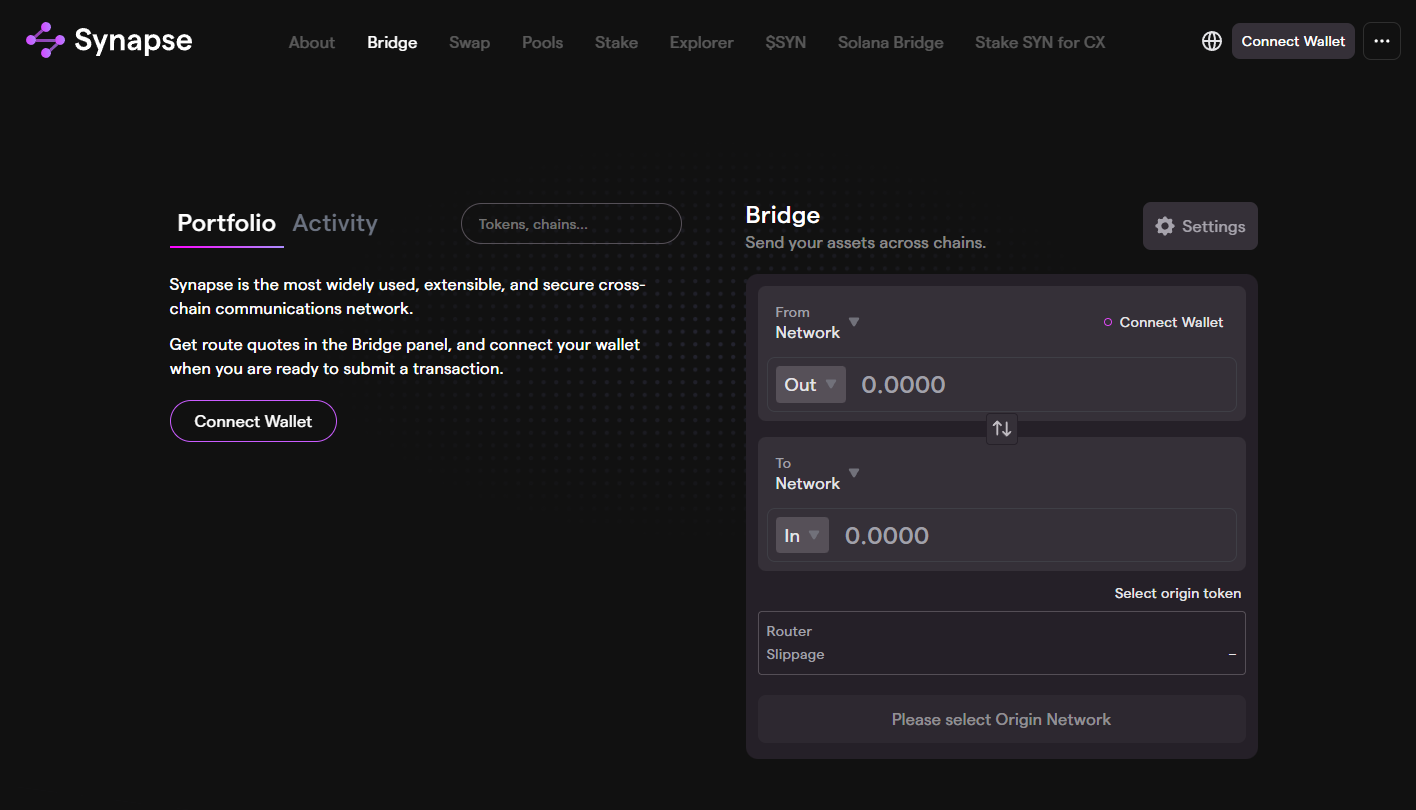
2. Synapse Protocol — Best for Speed Across 20+ Chains

Why Use It: Synapse combines liquidity pools with an optimistic verification model to deliver 2-5 minute average transfer times across 20+ networks, including Ethereum, Arbitrum, Optimism, Base, Polygon, BNB Chain, Avalanche, Fantom, Harmony, Moonbeam, and Aurora. Its nUSD and nETH synthetic assets enable efficient cross-chain swaps with competitive 0.05-0.3% fees, while the Synapse Bridge interface integrates one-click swaps for seamless UX.

Best For: Active traders prioritizing speed, multichain yield optimizers, NFT collectors moving assets, users bridging to emerging L2s.

Notable Features:

  • Sub-5-minute average transfers with optimistic verification
  • 20+ chain support including Base and zkSync Era
  • Integrated DEX for same-transaction swaps
  • Audited by Quantstamp, Certik, and Code4rena

Consider If: You move assets over $100K per transaction (liquidity depth varies by route) or need guaranteed finality before spending (optimistic delays possible).

Alternatives: Stargate Finance, Hop Protocol


3. Across Protocol — Best for Optimistic Bridging & Low Slippage

Why Use It: Across uses UMA's optimistic oracle to facilitate near-instant transfers with relayers fronting capital and settling on the destination chain within 1-4 minutes. Traders enjoy 0.01-0.25% fees—among the lowest for EVM bridges—and minimal slippage on major routes like Ethereum to Arbitrum, Optimism, Polygon, and Base. The protocol's capital efficiency makes it ideal for arbitrageurs and high-frequency movers.

Best For: Arbitrage traders, gas-sensitive users, high-frequency DeFi participants, cost-conscious portfolio managers.

Notable Features:

  • Optimistic verification for 1-4 minute transfers
  • Ultra-low fees (0.01-0.25%) with transparent pricing
  • Relayer network ensures liquidity without pool fragmentation
  • Audited by OpenZeppelin and ABDK with ongoing bug bounty

Consider If: You need non-EVM chain support (currently EVM-only) or prefer liquidity-pool-based bridges for guaranteed execution.

Alternatives: Stargate Finance, Synapse Protocol


4. Wormhole — Best for Cross-Ecosystem Bridging

Why Use It: Wormhole is a generalized messaging protocol supporting 30+ blockchains including Ethereum, Solana, Terra, BNB Chain, Avalanche, Polygon, Fantom, Celo, and Cosmos-based chains. Its Guardian network of 19 validators enables lock-and-mint bridging for tokens and NFTs with no protocol fees beyond network gas costs. The recent Wormhole Connect widget simplifies integrations for traders using multichain dApps.

Best For: Cross-ecosystem traders (EVM to Solana/Cosmos), NFT collectors, developers integrating bridging, users of Wormhole-native dApps.

Notable Features:

  • 30+ chain support including Solana, Terra, and Cosmos IBC
  • Generalized messaging enables cross-chain smart contract calls
  • Guardian network with 19 institutional validators
  • Audited by Neodyme, Kudelski, and OtterSec post-2022 exploit recovery

Consider If: You prioritize speed over security guarantees (5-20 min transfers) or need the deepest liquidity per route (Stargate/Synapse stronger for stables).

Alternatives: Axelar, Celer cBridge


5. Celer cBridge — Best for 40+ Chain Coverage

Why Use It: Celer cBridge supports 40+ blockchains with a hybrid liquidity pool and state channel architecture, enabling 3-10 minute transfers at 0.04-0.2% fees. Its State Guardian Network provides security for cross-chain state verification, while the cBridge UI offers direct wallet integrations and historical transaction tracking. Recent additions include support for zkSync Era, Linea, and Scroll.

Best For: Multichain portfolio managers, traders accessing niche L2s, users bridging to gaming-focused chains, cost-conscious cross-chain swappers.

Notable Features:

  • 40+ chains including zkSync, Linea, Mantle, and Scroll
  • State Guardian Network for optimistic cross-chain verification
  • Integrated liquidity mining for yield on idle bridge assets
  • Audited by Certik, PeckShield, and SlowMist

Consider If: You operate in mainland China (limited access) or need guaranteed sub-5-minute finality (optimistic delays on congested routes).

Alternatives: Synapse Protocol, Axelar


6. Hop Protocol — Best for Ethereum L2 Bridging

Why Use It: Hop specializes in fast transfers between Ethereum mainnet and nine major L2s (Arbitrum, Optimism, Base, Polygon, zkSync Era, Linea, Scroll, Gnosis Chain, and Polygon zkEVM) using AMM-style liquidity pools and decentralized bonders who provide instant liquidity. Traders pay 0.04-0.25% fees and experience 10-30 minute average transfers, with the option to earn yield by providing liquidity or running bonder nodes.

Best For: L2-first traders, Ethereum mainnet to L2 bridgers, liquidity providers, users seeking decentralized bridge architecture.

Notable Features:

  • Native L2 focus with support for 9 Ethereum L2s
  • AMM-based liquidity pools for transparent pricing
  • Decentralized bonder network reduces trust assumptions
  • Audited by Consensys Diligence and OpenZeppelin

Consider If: You need to bridge to non-EVM chains (Ethereum ecosystem only) or require sub-10-minute finality consistently (bonder availability varies).

Alternatives: Synapse Protocol, Across Protocol


7. Axelar — Best for Cosmos & Proof-of-Stake Security

Why Use It: Axelar is a Cosmos SDK-based interoperability network with 75+ validators securing cross-chain transfers via proof-of-stake consensus. Supporting 50+ chains with IBC-native bridging to Cosmos, Osmosis, Injective, and other app-chains, Axelar enables secure general message passing for complex cross-chain dApp interactions at 0.1-0.5% fees. Transfers settle in 5-15 minutes with high finality guarantees.

Best For: Cosmos ecosystem traders, institutional users prioritizing security, developers building cross-chain dApps, users requiring verifiable bridge security.

Notable Features:

  • 75+ decentralized validators with proof-of-stake security
  • Native IBC support for Cosmos ecosystem chains
  • General Message Passing (GMP) for cross-chain smart contracts
  • Audited by NCC Group, OtterSec, and Certik

Consider If: You prioritize speed over security (5-15 min slower than optimistic bridges) or need the lowest fees per transaction (0.1-0.5% higher than Across/Stargate).

Alternatives: Wormhole, Celer cBridge


8. Multichain — Best for 80+ Chain Access (Use With Caution)

Why Use It: Multichain (formerly Anyswap) offers the broadest chain coverage with 80+ supported networks using SMPC (Secure Multi-Party Computation) signers for lock-and-mint bridging. While historically popular for accessing niche chains like Moonriver, Kava, and Metis, the protocol faced security concerns in mid-2023 related to validator key management. Fees range from 0.1-0.3% with 10-30 minute transfer times.

Best For: Users bridging to obscure chains unavailable elsewhere, legacy dApp integrations, traders willing to accept elevated risk for maximum coverage.

Notable Features:

  • 80+ chain support including niche L1s and L2s
  • Long operational history since 2020
  • Cross-chain router for multi-hop transactions
  • SMPC validator network (security incidents reported)

Consider If: Security is your top priority (2023 exploit drained $126M; ongoing validator concerns) or you need active development and transparent disclosures.

Alternatives: Celer cBridge, Axelar


9. Orbiter Finance — Best for L2-to-L2 Transfers

Why Use It: Orbiter uses a maker-taker model where centralized makers provide instant liquidity for L2-to-L2 transfers across 15+ chains including Arbitrum, Optimism, zkSync Era, StarkNet, Linea, Base, and Scroll. Transfers complete in 1-10 minutes at 0.05-0.3% fees, with ZK-proof verification planned for enhanced security. The interface is optimized for mobile and shows real-time maker liquidity status.

Best For: L2-native traders, StarkNet and zkSync users, mobile-first users, traders needing fast L2 exits.

Notable Features:

  • Specialized L2-to-L2 focus with 15+ network support
  • 1-10 minute average transfers via maker liquidity
  • ZK-proof verification roadmap for trustless bridging
  • Real-time liquidity tracking and maker status

Consider If: You prefer fully decentralized bridge models (makers are centralized) or need mainnet-to-L2 bridging exclusively (better alternatives exist).

Alternatives: Hop Protocol, Synapse Protocol


10. Meson Finance — Best for Atomic Swap Security

Why Use It: Meson implements hash time-locked contracts (HTLCs) for trustless atomic swaps across 20+ chains, eliminating validator risk and bridge contract vulnerabilities. Traders benefit from 2-8 minute transfers at 0.02-0.15% fees with cryptographic guarantees that transactions either complete or refund automatically. The protocol is audited by SlowMist and maintains zero-exploit history since launch.

Best For: Security-conscious traders, users burned by bridge exploits, atomic swap enthusiasts, traders moving mid-sized amounts ($1K-$50K).

Notable Features:

  • HTLC-based atomic swaps for trustless bridging
  • Zero-exploit record with cryptographic security guarantees
  • 20+ chain support including major EVM and L2s
  • 0.02-0.15% fees competitive with optimistic bridges

Consider If: You need to bridge large amounts over $100K (liquidity depth limited) or require sub-2-minute finality (HTLC setup adds overhead).

Alternatives: Across Protocol, Stargate Finance


Decision Guide: Best By Use Case

  • Stablecoin arbitrage & DeFi yield: Stargate Finance for deepest USDC/USDT liquidity
  • Fastest cross-chain execution: Synapse Protocol or Across Protocol for sub-5-minute transfers
  • Ethereum L2 specialists: Hop Protocol for native L2 bridging with decentralized bonders
  • Cross-ecosystem traders (EVM + Solana/Cosmos): Wormhole or Axelar for broadest coverage
  • Lowest fees & slippage: Across Protocol for optimistic bridging at 0.01-0.25%
  • Maximum chain coverage: Celer cBridge (40+) or Multichain (80+ with caution)
  • L2-to-L2 focus (zkSync, StarkNet, Arbitrum): Orbiter Finance for maker-taker speed
  • Security-first & trustless: Meson Finance for atomic swap guarantees
  • Institutional security requirements: Axelar for proof-of-stake validator model
  • Mobile-optimized bridging: Orbiter Finance or Synapse Protocol

How to Choose the Right Cross-Chain Bridge (Checklist)

  • [ ] Verify chain support — Confirm both source and destination chains are supported with active liquidity
  • [ ] Check fee transparency — Review total costs including bridge fees, gas, and potential slippage before confirming
  • [ ] Assess security model — Understand validator architecture (optimistic, proof-of-stake, HTLC, multisig) and audit history
  • [ ] Review transfer speed requirements — Match bridge speed (1-30 min) to your trading strategy urgency
  • [ ] Confirm liquidity depth — For large transfers ($50K+), verify pool TVL and recent volume on your specific route
  • [ ] Test with small amounts first — Always bridge test transactions ($10-$100) before moving significant capital
  • [ ] Verify destination address format — Double-check address compatibility and network selection to avoid irreversible losses
  • [ ] Monitor bridge status pages — Check for maintenance, paused routes, or congestion warnings before transacting
  • [ ] Understand finality guarantees — Know if transfers are optimistic (reversible), instant (relayer-based), or cryptographically final
  • [ ] Review regional restrictions — Confirm access from your jurisdiction (most bridges global; check compliance)
  • [ ] Check exploit history — Research past security incidents and protocol responses (Wormhole 2022, Multichain 2023)
  • 🚩 Red flags: Bridges with undisclosed validator sets, paused routes without status updates, or fees significantly higher than quoted

Use Token Metrics With Any Cross-Chain Bridge

Maximize your cross-chain trading strategy by combining bridge infrastructure with Token Metrics intelligence:

  • AI Ratings screen 6,000+ tokens across chains to identify quality assets before bridging capital

  • Narrative Detection spots emerging themes (e.g., Solana DeFi, Base ecosystem) to inform which chains to bridge into
  • Portfolio Optimization balances risk across chains and suggests rebalancing targets that justify bridge costs
  • Alerts & Signals time bridge transactions around momentum shifts, reducing exposure to unfavorable price action mid-transfer

Workflow: Research asset quality with AI Ratings → Select optimal bridge for your route → Execute transfer → Monitor destination chain with real-time alerts.

Start your free trial to screen assets and time bridge transactions with AI-powered intelligence.


Security & Compliance Tips

  • Verify official URLs — Always access bridges through bookmarked official domains; phishing sites are common
  • Use hardware wallets — Sign bridge transactions with Ledger/Trezor for cold-storage protection
  • Check token approvals — Revoke unlimited approvals after bridging using tools like Revoke.cash
  • Monitor bridge exploits — Follow protocol Twitter accounts and status pages for real-time security alerts
  • Understand validator risks — Multisig and SMPC bridges concentrate risk; optimistic and PoS models distribute trust
  • Avoid bridging during congestion — High gas fees and slippage increase during network congestion; wait for off-peak times
  • Store bridge receipts — Save transaction hashes and screenshots for tax reporting and dispute resolution
  • Test cross-chain contract calls — If using advanced features (e.g., Axelar GMP), test with minimal amounts first
  • Review liquidity provider risks — Impermanent loss and smart contract risk apply to bridge LPs; understand before depositing
  • Know refund procedures — Understand each bridge's failed transaction refund process and timeframes

This article is for research and educational purposes, not financial advice. Conduct your own security due diligence before bridging assets.


Beginner Mistakes to Avoid

  • Bridging to the wrong network — Always triple-check destination chain selection; wrong-network transfers are often irreversible
  • Ignoring slippage on large transfers — Pools with <$10M TVL may experience 1-5% slippage on $100K+ transactions
  • Bridging illiquid tokens — Ensure destination chain has DEX liquidity before bridging obscure tokens
  • Not accounting for gas on destination chain — Bridge enough native tokens (ETH, MATIC, etc.) to pay for transactions on arrival
  • Trusting wrapped tokens blindly — Verify wrapped token contracts are legitimate before swapping (scam tokens common)
  • Bridging during protocol upgrades — Avoid bridging when protocols announce maintenance windows or upgrades
  • Falling for "instant bridge" scams — No legitimate bridge offers instant finality across all chains; be skeptical of unrealistic claims
  • Ignoring bridge insurance options — Services like Nexus Mutual offer bridge exploit coverage for eligible protocols

FAQs

What is a cross-chain bridge?
 A cross-chain bridge is a protocol that enables asset transfers between different blockchains by locking tokens on the source chain and minting or unlocking equivalent tokens on the destination chain. Bridges use various security models including lock-and-mint, liquidity pools, optimistic verification, and atomic swaps to facilitate interoperability.

Are cross-chain bridges safe?
 Bridge security varies significantly by architecture and track record. Bridges secured by proof-of-stake validators (Axelar) or atomic swaps (Meson) offer stronger security than multisig or SMPC models. Historical exploits affecting Wormhole ($325M in 2022) and Multichain ($126M in 2023) highlight risks. Always verify audit reports, exploit history, and validator transparency before bridging significant amounts.

How much do cross-chain bridges cost?
 Bridge fees typically range from 0.01% to 0.5% of transfer amount, plus source and destination chain gas fees. Stargate and Across charge 0.01-0.06% for stablecoins, while Axelar charges 0.1-0.5% for broader coverage. Total costs including gas often range from $5-$50 for typical transactions, but can exceed $100 during Ethereum mainnet congestion.

Can I bridge any token between any chains?
 No—token bridging depends on protocol support and liquidity availability. Major tokens (USDC, USDT, ETH, WBTC) have deep liquidity on most bridges, while obscure tokens may only bridge via wrapped versions or not at all. Always verify token support on both source and destination chains before attempting transfers.

How long do cross-chain bridge transfers take?
 Transfer times range from 1 minute (Across optimistic transfers) to 30+ minutes (Hop during congestion or Multichain on slower chains). Average speeds: Across 1-4 min, Synapse 2-5 min, Stargate 1-15 min, Wormhole 5-20 min. Optimistic bridges are fastest but may delay finality during disputes; lock-and-mint bridges prioritize security over speed.

Do I need native tokens on the destination chain before bridging?
 Not for the bridge transaction itself, but you'll need native tokens (ETH on Ethereum, MATIC on Polygon, etc.) to pay gas for any subsequent transactions on the destination chain. Some bridges offer small gas token bridging or faucet integrations, but plan to bridge sufficient native tokens alongside your primary assets.

What happens if my bridge transaction fails?
 Failed transactions typically result in automatic refunds to the source address within 24-72 hours, though timelines vary by protocol. Optimistic bridges may take longer during dispute periods. Always save transaction hashes and monitor bridge status pages for updates. Contact protocol support via Discord or Telegram for transactions stuck beyond normal timeframes.

Can I use bridges for NFTs or only fungible tokens?
 Most bridges focus on fungible tokens (ERC-20, SPL, etc.), but several support NFT bridging. Wormhole enables NFT transfers across 30+ chains, while specialized solutions like Axelar and Celer support NFT metadata preservation. NFT bridges often charge fixed fees ($5-$20) regardless of NFT value and may take longer than fungible token transfers.


Conclusion + Related Reads

Selecting the right cross-chain bridge depends on your priorities: Stargate Finance delivers the deepest stablecoin liquidity for DeFi-focused traders, Synapse Protocol offers the fastest execution across 20+ chains, and Across Protocol provides the lowest fees for cost-conscious arbitrageurs. Security-first users should consider Meson Finance for atomic swap guarantees or Axelar for institutional-grade proof-of-stake validation. Always test with small amounts, verify destination addresses, and monitor bridge status pages before moving significant capital.

Related Reads:

Research

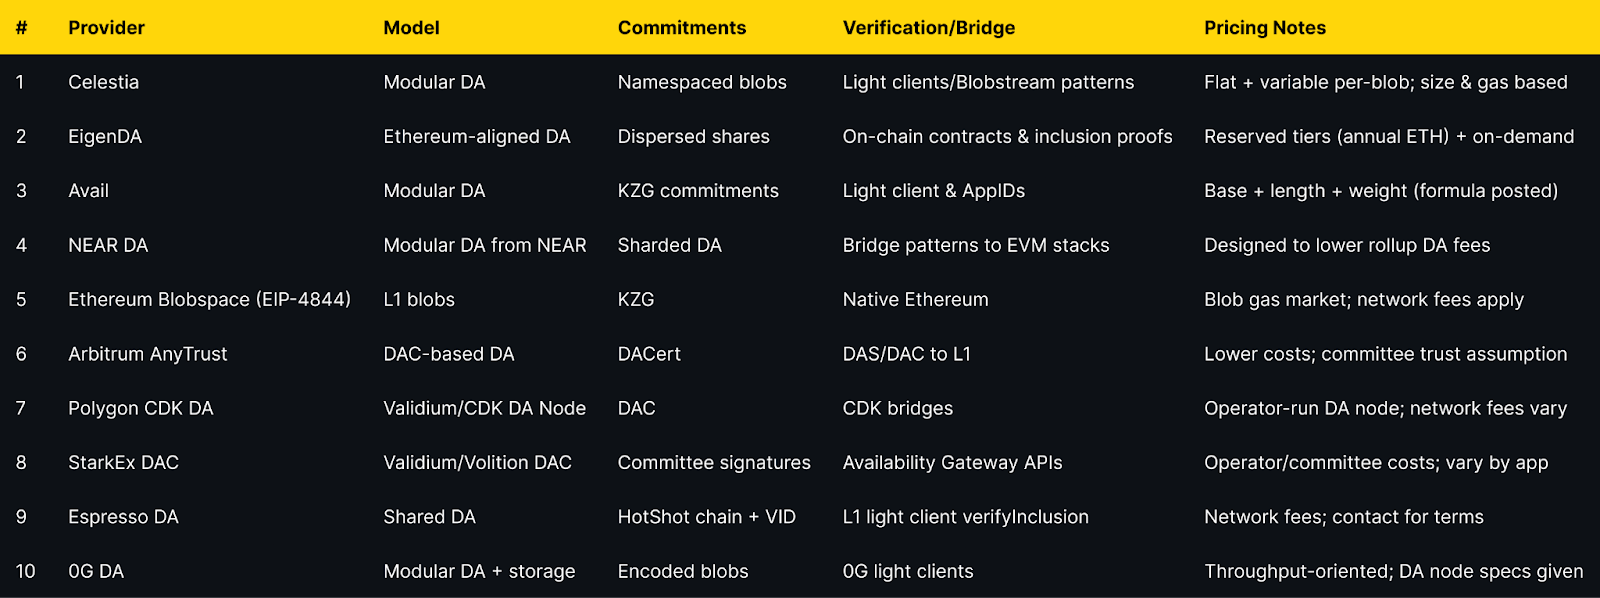
Top Data Availability Layers (2025)

Token Metrics Team
11 min read

Who this guide is for. Teams launching rollups or appchains that need reliable, verifiable data availability layers to minimize costs while preserving security.

Top three picks.

  • Celestia — lowest-friction modular DA with broad tooling and clear blob fee model.
  • EigenDA — high-throughput, Ethereum-aligned DA with reserved/on-demand bandwidth tiers.
  • Avail — production DA with developer-friendly docs and transparent fee formula.

Caveat. Fees vary by data size, congestion, and commitment type (on-chain blobs vs. off-chain DA/DAC). Always confirm region eligibility and SLAs in provider docs.


Introduction: Why Data Availability Layers Matter in November 2025

Data availability layers let rollups publish transaction data so anyone can reconstruct state and verify proofs. In 2025, modular stacks (OP Stack, Polygon CDK, ZK Stack) routinely separate execution from DA to optimize costs and performance. Your DA choice affects security (trust assumptions), fees (blob gas vs. DA network fees), and UX (latency, bandwidth caps).
Search intent here is commercial-investigational: teams comparing providers by cost, security model, and integration options. We’ll keep things concrete, link only official sources, and show exactly who each option fits.

How We Picked (Methodology & Scoring)

  • Liquidity/Scale — 30%: adoption, throughput, sustained bandwidth.
  • Security — 25%: trust assumptions (L1 blobs vs. DAC), transparency, docs.
  • Coverage — 15%: SDKs, stacks supported (OP Stack, Polygon CDK, ZK Stack), bridges.
  • Costs — 15%: posted pricing/fee mechanics.
  • UX — 10%: setup, tooling, observability.
  • Support — 5%: docs, guides, contact points.
    Data from official docs/pricing/status pages; third-party datasets used only for cross-checks. Last updated November 2025.


Top 10 Data Availability Layers in November 2025

1. Celestia — Best for modular DA at predictable blob economics

Why Use It. Celestia specializes in DA with namespaced blobs and data availability sampling. Fees are a flat transaction fee plus a variable component based on blob size, so costs scale with data posted rather than execution. Clear “PayForBlobs” guidance and explorers make planning straightforward. (blog.bcas.io)
Best For. OP Stack/sovereign rollups; teams optimizing DA cost; multi-chain deployments.
Notable Features. Namespaced blobs; fee market tied to blob size; tooling for PFB; docs on submitting and estimating fees. (Celestia Docs)
Fees Notes. Flat + variable per-blob; gas-price prioritized. (Celestia Docs)
Regions. Global (check validator/geography exposure in explorers).
Consider If. You want modular DA with transparent per-blob costs.
Alternatives. EigenDA, Avail.  


2. EigenDA — Best for high throughput with reserved bandwidth tiers

Why Use It. EigenDA is built on EigenLayer and offers mainnet DA with published reserved bandwidth tiers (annual ETH) and on-demand options. Strong alignment with Ethereum restaking and high advertised throughput. (docs.eigencloud.xyz)
Best For. High-throughput L2s; OP Stack/Orbit/CDK chains seeking cloud-grade throughput.
Notable Features. Reserved tiers (e.g., 512–2048 KiB/s and up), on-demand pricing updates, EigenLayer operator set. (eigenda.xyz)
Fees Notes. Reserved pricing in ETH per year; on-demand available. (eigenda.xyz)
Regions. Global.
Consider If. You want capacity commitments and Ethereum-aligned security.
Alternatives. Celestia, Avail.  


3. Avail — Best for dev-friendly docs and transparent fee formula

Why Use It. Avail provides DA with clear developer pathways (AppIDs, deploy rollups) and posts a fee formula: base + length + weight + optional tip. Guides include OP Stack and ZK Stack integrations. (docs.availproject.org)
Best For. Teams needing step-by-step deployment templates and cost modeling.
Notable Features. AppID model; OP Stack/Validium guides; fee components documented. (docs.availproject.org)
Fees Notes. Base + length + weight + optional tip; congestion multiplier. (docs.availproject.org)
Regions. Global.
Consider If. You want docs-first integration and a transparent pricing formula.
Alternatives. Celestia, EigenDA.  


4. NEAR Data Availability (NEAR DA) — Best for cost-reduction via NEAR’s sharded DA

Why Use It. NEAR modularizes its DA layer for external rollups, aiming to lower DA fees while leveraging its sharded architecture. Official materials target Ethereum rollups explicitly. (docs.near.org)
Best For. Rollups prioritizing low DA cost and sharded throughput.
Notable Features. Sharded DA; chain-abstraction docs; community implementations (e.g., Nuffle). (docs.near.org)
Fees Notes. Designed to reduce rollup DA cost; confirm network fees in docs. (NEAR)
Regions. Global.
Consider If. You want a low-cost DA path and EVM interoperability.
Alternatives. Avail, Celestia.


5. Ethereum Blobspace (EIP-4844) — Best for maximum L1 neutrality with ephemeral blobs

Why Use It. Post data to Ethereum blobs for protocol-level guarantees during the blob retention window (~18 days). Ideal for projects that want L1 alignment and can operate within ephemeral storage constraints and blob gas markets. (Ethereum Improvement Proposals)
Best For. Security-first teams preferring L1 attestation and ecosystem neutrality.
Notable Features. KZG commitments; ephemeral blob storage; native verification. (ethereum.org)
Fees Notes. Blob gas; variable by demand; L1 network fees apply. (ethereum.org)
Regions. Global.
Consider If. You accept blob retention limits and variable blob pricing.
Alternatives. Celestia, EigenDA.


6. Arbitrum AnyTrust (DAC) — Best for cost-optimized OP-style chains using a DAC

Why Use It. AnyTrust lowers costs by storing data with a Data Availability Committee and posting certificates on L1. Detailed runbooks exist for configuring DACs for Orbit chains. (docs.arbitrum.io)
Best For. Orbit chains and apps with mild trust assumptions for lower fees.
Notable Features. DACert flow; DAS; step-by-step DAC deployment docs. (docs.arbitrum.io)
Fees Notes. Lower posting costs; committee/infra costs vary. (docs.arbitrum.io)
Regions. Global (committee member distribution varies).
Consider If. You want cheaper DA and can trust a DAC quorum.
Alternatives. Polygon CDK DA, StarkEx DAC.


7. Polygon CDK Data Availability — Best for CDK chains wanting Validium-style DA

Why Use It. CDK chains can use a DA node and DAC approach for Validium-style costs, with official repos describing the CDK DA component. Best fit if you’re already on CDK and want DA flexibility. (polygon.technology)
Best For. Polygon CDK deployers; validium-first apps.
Notable Features. CDK DA node repo; DAC configuration; CDK ecosystem tooling. (GitHub)
Fees Notes. Operator/committee costs; network fees vary by setup. (polygon.technology)
Regions. Global.
Consider If. You need CDK-native DA with Validium trade-offs.
Alternatives. Arbitrum AnyTrust, EigenDA.


8. StarkEx Data Availability Committee — Best for Validium/Volition deployments needing DAC maturity

Why Use It. StarkEx supports Validium and Volition modes via a DAC with APIs (Availability Gateway) and reference implementations for committee nodes. Production-hardened across top apps. (docs.starkware.co)
Best For. High-volume ZK apps on StarkEx preferring low DA costs.
Notable Features. DAC reference code; Volition support; batch data APIs. (GitHub)
Fees Notes. Committee/infra costs; app-specific. (docs.starkware.co)
Regions. Global (committee selection per app).
Consider If. You accept DAC trust assumptions for cost savings.
Alternatives. Arbitrum AnyTrust, Polygon CDK DA.


9. Espresso DA — Best for shared DA paired with neutral sequencing

Why Use It. Espresso offers a shared DA with HotShot consensus and a light-client verifyInclusion function for on-chain verification, designed to interoperate with other DA choices if desired. (docs.espressosys.com)
Best For. Rollups adopting shared sequencing and wanting cheap DA.
Notable Features. HotShot consensus; three-layer DA architecture; flexible with other DAs. (L2BEAT)
Fees Notes. Network fees; contact providers/infrastructure partners for terms. (blockdaemon.com)
Regions. Global.
Consider If. You want shared sequencing + DA as a package.
Alternatives. EigenDA, Celestia.


10. 0G DA — Best for high-throughput apps (AI/gaming) needing DA + storage

Why Use It. 0G pairs a DA layer with a general-purpose storage system and provides DA node specs and runbooks. Positioned for high-volume data workloads and fast retrieval. (docs.0g.ai)
Best For. Data-heavy chains (AI, gaming) needing scalable DA and storage.
Notable Features. Encoded blob data; DA node specs; whitepaper architecture (DA atop storage). (GitHub)
Fees Notes. Throughput-oriented network; confirm current pricing with 0G. (0g.ai)
Regions. Global.
Consider If. You’re optimizing for data-heavy throughput and retrieval.
Alternatives. Celestia, Avail.


Decision Guide: Best By Use Case


How to Choose the Right Data Availability Layer (Checklist)

  • ☐ Region eligibility and any operator restrictions documented
  • ☐ Security model fits app (L1 blobs vs. modular DA vs. DAC)
  • ☐ Fee mechanics are explicit (blob gas, per-blob size, or formula)
  • ☐ Tooling and SDKs for your stack (OP Stack, CDK, ZK Stack)
  • ☐ Throughput/bandwidth and quotas published or contractually reserved
  • ☐ Observability: explorers, status pages, inclusion proofs/light clients
  • ☐ Clear guides for deployment and migration paths
  • ☐ Support channels and escalation (SLA/contacts)
  • Red flags: no official fee notes, opaque committees, or missing verification docs.

Use Token Metrics With Any Data Availability Layer

  • AI Ratings to screen assets by quality and momentum.


  • Narrative Detection to spot early theme shifts.
  • Portfolio Optimization to balance risk across chains.
  • Alerts & Signals to time entries/exits.
    Workflow: Research → Select DA → Launch rollup/appchain → Monitor with alerts.

Start free trial to screen assets and time entries with AI.  


Security & Compliance Tips

  • Run independent verification (light clients/inclusion proofs) where available.
  • For DACs, diversify committee members and publish membership changes.
  • Monitor quotas/latency; set fallbacks (e.g., switch DA mode where stack supports Alt-DA). (docs.optimism.io)
  • Validate official endpoints; beware of phishing and copycat docs.
  • Track fee spikes (blob gas, congestion multipliers) and set budget alarms. (ethereum.org)
  • Document upgrade paths and retention windows (e.g., blob expiry). (ethereum.org)

This article is for research/education, not financial advice.


Beginner Mistakes to Avoid

  • Treating DA choice as “set-and-forget” without monitoring fees and bandwidth.
  • Ignoring blob retention on Ethereum and assuming permanence. (ethereum.org)
  • Using a DAC without clear membership and recovery processes. (docs.arbitrum.io)
  • Skipping test deployments to measure real blob sizes and costs.
  • Overlooking verification UX (light clients/proofs) for end users.
  • Assuming all stacks support seamless DA switching without work. (docs.optimism.io)

How We Picked (Methodology & Scoring)

Scoring Weights (sum = 100): Liquidity/Scale 30, Security 25, Coverage 15, Costs 15, UX 10, Support 5.
We examined official docs for pricing/fees, security/verification, and deployment guides. We favored providers with explicit fee notes (formulas or tiers), clear verification models, and active ecosystem integrations. Last updated November 2025.


FAQs

What are data availability layers?
 They’re systems that publish rollup data so anyone can reconstruct state and verify proofs. They range from L1 blobs (Ethereum EIP-4844) to modular DA networks (Celestia, Avail) and DACs. (ethereum.org)

Are blobs on Ethereum permanent?
 No. Blob data is retained for a limited window (~18 days). If you need permanent access, you must snapshot or use a DA with different retention. (ethereum.org)

How do DA fees work?
 Fees vary: Celestia ties fees to blob size and gas; Avail publishes a base/length/weight formula; Ethereum blobs use a blob-gas market; EigenDA offers reserved bandwidth tiers. (Celestia Docs)

What’s a DAC and when should I use one?
 A Data Availability Committee stores data off-chain and posts certificates or signatures to L1. It’s cheaper but introduces committee trust assumptions. Used by Arbitrum AnyTrust, StarkEx/Volition, and CDK Validium. (docs.arbitrum.io)

Can OP Stack chains plug into alternative DA?
 Yes. OP Stack supports Alt-DA mode to integrate various DA layers. Validate trade-offs and tooling before switching. (docs.optimism.io)


Conclusion + Related Reads

If you want transparent per-blob costs and strong tooling, pick Celestia. For capacity commitments and Ethereum alignment, choose EigenDA. If you want a formula-based fee model with practical guides, Avail is compelling. DAC-based routes (AnyTrust, StarkEx, CDK) suit cost-sensitive apps comfortable with committee trust assumptions.

Related Reads (Token Metrics)

Research

Top Optimistic Rollups & L2 Ecosystems (2025)

Token Metrics Team
13 min read

Who this guide is for. Builders, power users, and teams choosing where to deploy or transact on Ethereum-style optimistic rollups and OP Stack L2s in 2025.

Top three picks.

  • Arbitrum One — broadest DeFi depth and mature fraud proofs.
  • OP Mainnet (Optimism) — feature-complete fault proofs, the Superchain standard.
  • Base — OP Stack at scale with strong developer docs and low, predictable fees. (docs.arbitrum.io)

One key caveat. Withdrawals to L1 use a challenge period (~7 days) on optimistic rollups; fast bridges can bypass with extra trust/cost. (docs.arbitrum.io)


Introduction: Why Optimistic Rollups & L2 Ecosystems Matter in November 2025

Optimistic rollups are L2 networks that post transaction data to Ethereum and assume validity unless challenged via fraud (fault) proofs, enabling cheaper, faster transactions while inheriting Ethereum’s security. They matter now because OP Stack chains have standardized tooling, bridges, and proofs, and multiple ecosystems (Arbitrum, Optimism, Base, Mode, World Chain, Fraxtal, Zora, opBNB, Blast, Metis) have reached scale. Primary keyword: Top Optimistic Rollups. (docs.arbitrum.io)


How We Picked (Methodology & Scoring)

We shortlisted ~20 credible L2s, then scored and selected TOP_N = 10 using official docs for architecture, fees, bridges, and proof status. Third-party datasets were used only for cross-checks.

Scoring Weights (sum = 100):

  • Liquidity — 30%
  • Security (proofs, upgrade path, disclosures) — 25%
  • Coverage (ecosystem depth, tooling) — 15%
  • Costs (fees, DA approach) — 15%
  • UX (bridging, docs) — 10%
  • Support — 5%

Freshness: Last updated November 2025. (docs.optimism.io)


Notes: “Typical fees” reflect L2 execution + L1 data costs; withdraws to L1 follow a challenge window on optimistic designs. (docs.arbitrum.io)


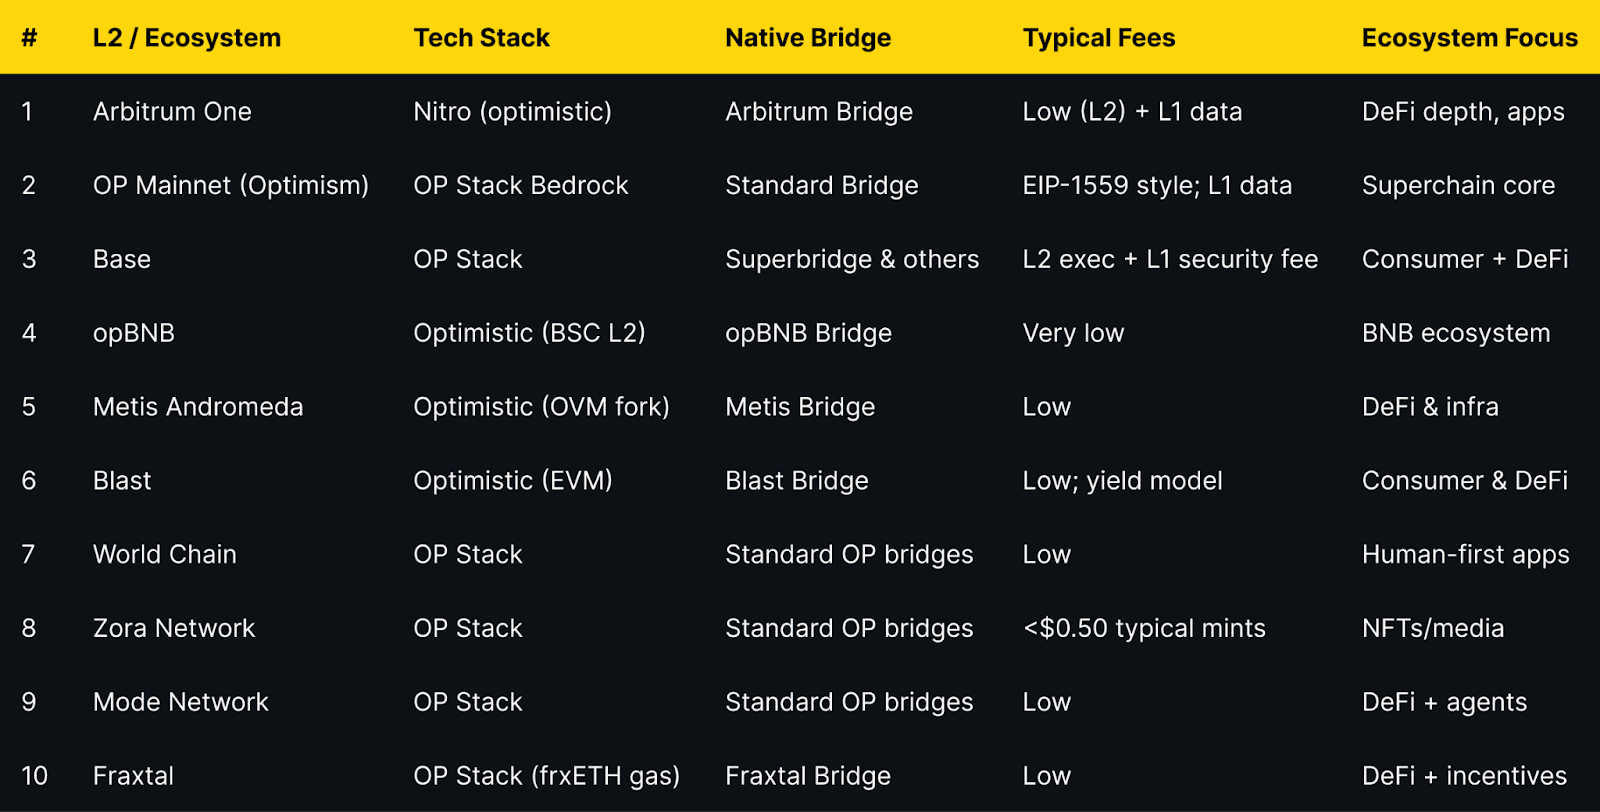
Top 10 Optimistic Rollups & L2 Ecosystems in November 2025

1. Arbitrum One — Best for deep DeFi liquidity

Why Use It. Arbitrum’s Nitro stack delivers mature optimistic security with interactive fraud proofs and broad app coverage. Official docs emphasize the one-week challenge window for L1 withdrawals and support for fast-withdrawal patterns. (docs.arbitrum.io)
Best For. DeFi protocols, power users, market makers.
Notable Features. Fraud-proof system; Nitro throughput; ecosystem depth; L2→L1 fast-withdraw patterns. (docs.arbitrum.io)
Fees Notes. L2 gas + L1 data costs.
Regions. Global (availability depends on wallet/exchange access).
Alternatives. OP Mainnet, Base.  

2. OP Mainnet (Optimism) — Best for Superchain standardization

Why Use It. The OP Stack introduced feature-complete fault proofs on June 10, 2024, enabling permissionless challenge of proposed outputs. Fees follow EIP-1559-style mechanics, with Ecotone updates relaying blob base fees. (docs.optimism.io)
Best For. Teams planning multichain OP Stack deployments; public goods alignment.
Notable Features. Standard Bridge; strong docs; Superchain governance. (docs.optimism.io)
Fees Notes. Execution gas as on L1 plus L1 data; EIP-1559 style. (docs.optimism.io)
Regions. Global.
Alternatives. Base, Mode.  

3. Base — Best for builder UX at scale

Why Use It. Base provides clear fee breakdowns (L2 execution + L1 security fee) and robust docs for bridging and development; widely adopted across consumer and DeFi apps. (docs.base.org)
Best For. Consumer apps, gaming, creators, DeFi teams.
Notable Features. OP Stack chain; programmatic bridging examples; security council documentation. (docs.base.org)
Fees Notes. Two-component fee model (L2 + L1). (docs.base.org)
Regions. Global.
Alternatives. OP Mainnet, Arbitrum.  

4. opBNB (BNB Chain) — Best for BNB ecosystem cost sensitivity

Why Use It. opBNB uses an optimistic rollup to scale BNB Smart Chain with very low fees and high throughput for EVM apps. Docs include explicit L1 data fee formulas. (docs.bnbchain.org)
Best For. Cost-sensitive deployments, BNB ecosystem projects.
Notable Features. OP-style architecture; low-fee environment; BNB chain integrations. (docs.bnbchain.org)
Fees Notes. Very low L2 gas; DA fee formula documented. (docs.bnbchain.org)
Regions. Global.
Alternatives. Base, Mode.

5. Metis Andromeda — Best for sequencer decentralization roadmap

Why Use It. Metis is an optimistic rollup emphasizing a decentralized sequencer pool and performance improvements through its Andromeda roadmap. (metis.io)
Best For. Teams valuing sequencer-level resiliency; DeFi infra.
Notable Features. OVM-lineage EVM equivalence; decentralizing sequencer; ecosystem grants. (L2BEAT)
Fees Notes. Low L2 gas; standard optimistic withdrawal window.
Regions. Global.
Alternatives. Arbitrum, OP Mainnet.

6. Blast — Best for native yield design

Why Use It. Blast is an EVM-compatible optimistic rollup with native yield for ETH and stables at the protocol level, while inheriting Ethereum security. (docs.blast.io)
Best For. Consumer apps and DeFi seeking built-in yield flows.
Notable Features. Yield on bridged assets; OP-style architecture; EVM tooling. (L2BEAT)
Fees Notes. Low L2 gas; standard optimistic withdrawal semantics.
Regions. Global.
Alternatives. Base, Mode.

7. World Chain — Best for human-centric apps

Why Use It. Built on the OP Stack, World Chain prioritizes verified human users with gas allowances and personhood-aware UX, suitable for consumer on-ramps and identity-heavy apps. (docs.world.org)
Best For. Identity-centric consumer apps, payments.
Notable Features. OP Stack standardization; personhood primitives; Superchain membership. (L2BEAT)
Fees Notes. Low L2 gas; standard OP Stack bridging/withdrawals.
Regions. Global.
Alternatives. Base, OP Mainnet.

8. Zora Network — Best for creators & NFTs

Why Use It. Zora is an OP Stack L2 focused on media/NFTs, with docs citing typical NFT mint costs under $0.50 and clear OP Stack security inheritance. (zora.energy)
Best For. NFT marketplaces, media apps, creator tools.
Notable Features. Flat mint fees for collectors; OP Stack tooling; creator-first ecosystem. (docs.growthepie.xyz)
Fees Notes. Low, NFT-friendly fees; network fees apply. (zora.energy)
Regions. Global.
Alternatives. Base, Blast.

9. Mode Network — Best for DeFi + agentic apps

Why Use It. Mode is an OP Stack L2 positioned as a DeFi and agent economy hub, aligning to the Superchain and contributing sequencer fees to OP Collective. (docs.mode.network)
Best For. DeFi protocols, AI/agentic apps.
Notable Features. OP Stack mainnet configuration; Superchain integrations; incentives. (docs.mode.network)
Fees Notes. Low L2 gas; standard OP Stack bridging/withdrawals.
Regions. Global.
Alternatives. OP Mainnet, Base.

10. Fraxtal — Best for DeFi incentives & frxETH gas

Why Use It. Fraxtal is an OP Stack L2 with frxETH as gas and modular DA; official docs cover bridge support and OP Stack compatibility. (docs.frax.finance)
Best For. DeFi protocols leveraging blockspace incentives and ETH-centric gas.
Notable Features. OP Stack; frxETH gas; Flox incentives; native bridge. (Frax)
Fees Notes. Low L2 gas; standard OP Stack withdrawal semantics.
Regions. Global.
Alternatives. Mode, OP Mainnet.


Decision Guide: Best By Use Case


How to Choose the Right Optimistic Rollup (Checklist)

  • Region eligibility for your users and app store distribution.
  • Fraud/fault proofs live and documented; withdrawal challenge period understood. (docs.optimism.io)
  • Data availability costs and L1 data fee exposure. (docs.optimism.io)
  • Bridge UX: native vs third-party, fast-withdraw options. (docs.optimism.io)
  • Sequencer model and roadmap to decentralization. (metis.io)
  • Fees transparency (L2 execution + L1 security fee). (docs.base.org)
  • Official docs, status, and upgrade cadence. (docs.optimism.io)
  • Ecosystem fit (DeFi, NFTs, consumer, identity).
  • Support channels, incident response, and disclosures.
  • Red flags: unclear proofs, opaque bridges, or abandoned docs.

Use Token Metrics With Any Optimistic Rollup

  • AI Ratings to screen assets by quality and momentum.


  • Narrative Detection to spot early theme shifts across ecosystems.
  • Portfolio Optimization to balance risk across L1/L2 exposure.
  • Alerts & Signals to time entries/exits as fees and activity shift.

Start free trial to screen assets and time entries with AI.  


Security & Compliance Tips

  • Prefer official standard bridges when possible; understand trust trade-offs of fast bridges. (docs.optimism.io)
  • Expect a ~7-day withdrawal window on optimistic rollups; plan treasury ops accordingly. (docs.arbitrum.io)
  • Verify contract addresses on official explorers/docs before bridging. (docs.base.org)
  • Monitor L1 data fee swings during high Ethereum congestion. (docs.optimism.io)
  • Review sequencer centralization and posted upgrade paths. (metis.io)
  • Keep seed/MPC practices high-hygiene; use hardware where possible.
  • {This article is for research/education, not financial advice.}

Beginner Mistakes to Avoid

  • Ignoring the challenge window and expecting instant L1 finality. (docs.arbitrum.io)
  • Bridging via unofficial URLs; always verify official docs. (docs.base.org)
  • Underestimating L1 data fees during network spikes. (docs.optimism.io)
  • Choosing an L2 without considering ecosystem fit (DeFi vs NFTs vs identity).
  • Deploying without reading security/proofs and upgrade notes. (docs.optimism.io)
  • Skipping incident/status pages and disclosures.

How We Picked (Methodology & Scoring)

  • Liqudity (30%) — adoption and app depth.
  • Security (25%) — proofs live, challenge periods, sequencer posture.
  • Coverage (15%) — ecosystem tooling, bridges.
  • Costs (15%) — fee transparency and DA approach.
  • UX (10%) — docs, onboarding, explorers, tooling.
  • Support (5%) — responsiveness and clarity.

We relied on official provider docs for architecture, fees, and bridges, cross-checking details where prudent. Last updated November 2025. (docs.optimism.io)


FAQs

What is an optimistic rollup?
 An L2 that posts transaction data to Ethereum and assumes validity unless challenged via fraud/fault proofs, cutting fees while inheriting L1 security. (docs.arbitrum.io)

How long do withdrawals take?
 Native L2→L1 withdrawals on optimistic designs include a challenge window (~7 days); fast bridges can provide liquidity sooner with additional trust/cost. (docs.arbitrum.io)

Why are fees sometimes higher?
 Your cost = L2 execution fee + L1 data fee; L1 data fees fluctuate with Ethereum demand and blob/base fee dynamics. (docs.base.org)

Is OP Stack the “standard” for OP-style chains?
 Yes, the OP Stack is the public-goods framework for OP-style L2s and Superchain members (e.g., OP Mainnet, Base, Mode, World Chain, Zora, Fraxtal). (docs.optimism.io)

What’s special about opBNB?
 It brings optimistic rollup design to the BNB ecosystem with very low fees and BSC alignment. (docs.bnbchain.org)

Which L2 is best for NFTs and creators?
 Zora Network is OP Stack-based and optimized for media/NFT mints with sub-$0.50 typical costs. (zora.energy)


Conclusion + Related Reads

If you want DeFi depth, start with Arbitrum or Base. For Superchain standardization and OP-native tooling, OP Mainnet and Mode are strong defaults. Creator projects should consider Zora, identity-centric apps World Chain, and yield-aware consumer apps Blast. For BNB-aligned deployments, opBNB offers ultra-low fees.

Related Reads (Token Metrics):

Choose from Platinum, Gold, and Silver packages
Reach with 25–30% open rates and 0.5–1% CTR
Craft your own custom ad—from banners to tailored copy
Perfect for Crypto Exchanges, SaaS Tools, DeFi, and AI Products